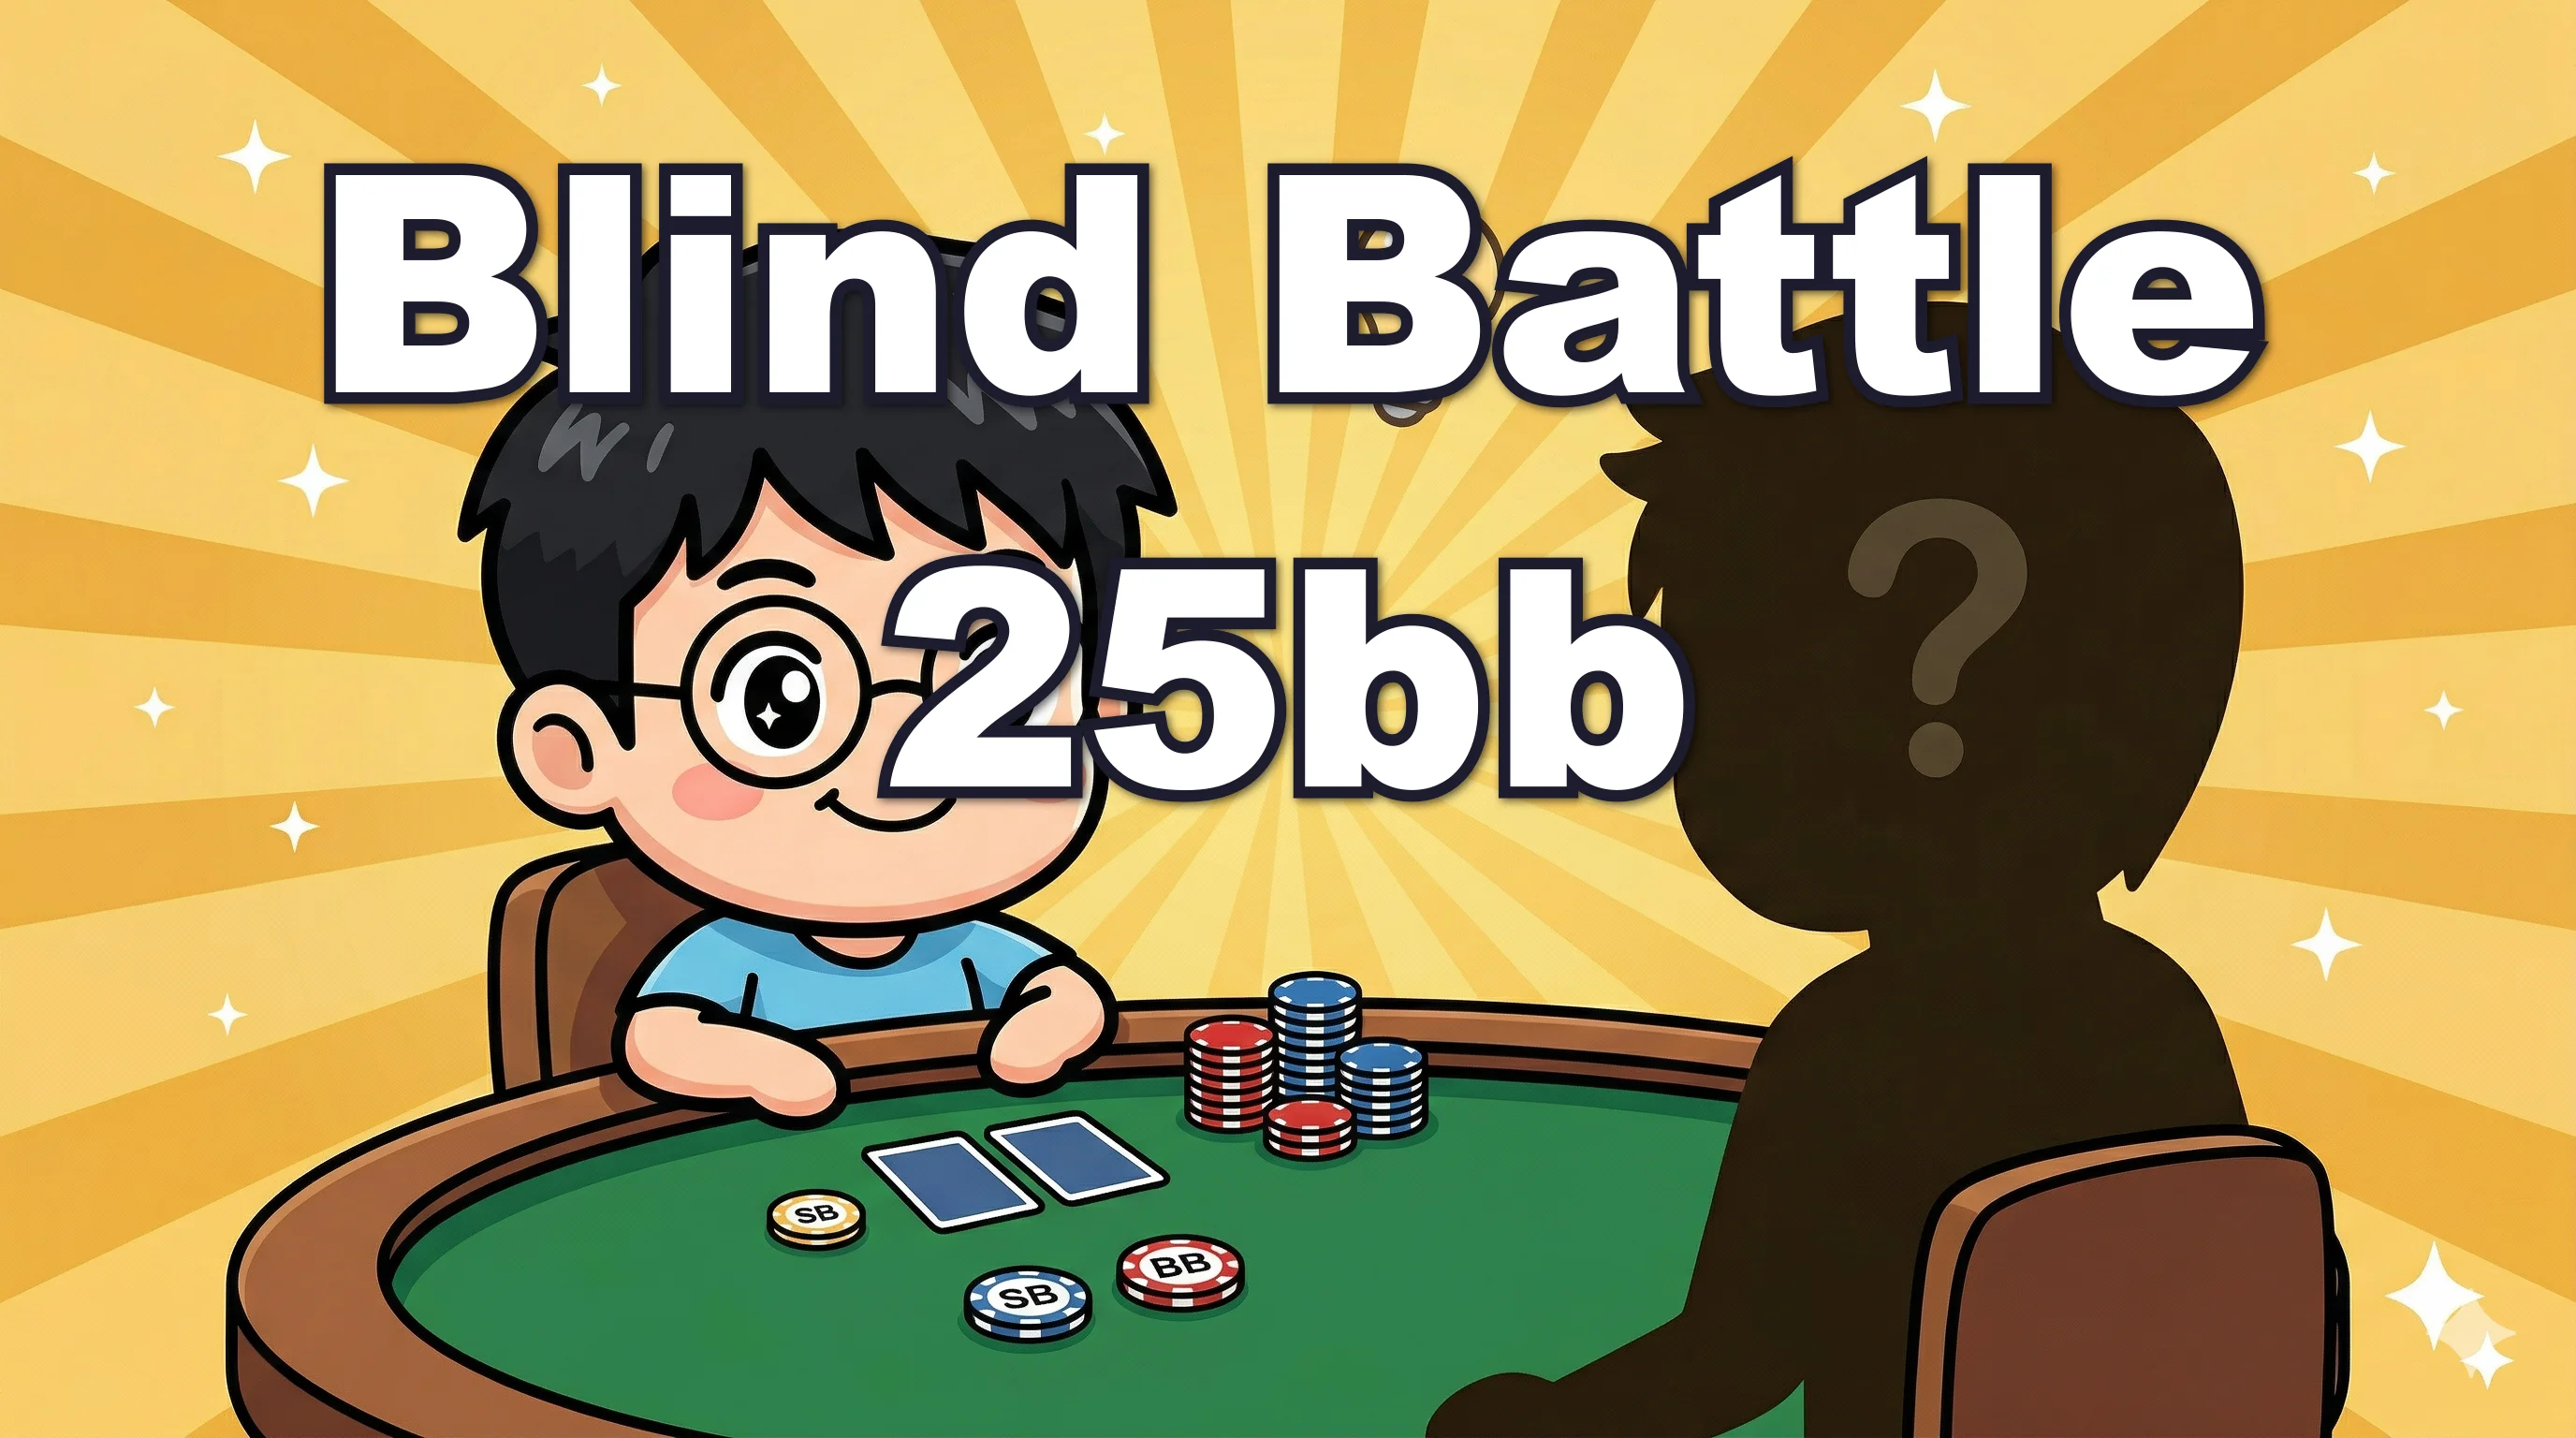
Blind Heads-Up C-Bet Strategy on Paired Boards (Limp-Raise Line) [Ajo MTT Vol.8]
The third postflop entry after Vol.6 (A-high) and Vol.7 (K-high). Same blind heads-up 25bb spot, same SB limp → BB 3BB raise → SB call line, but now the flop comes paired (rainbow only). We work through eight boards split into pair+2 (AA2 / KK2 / 882 / 442) and pair+T (AAT / KKT / 88T / 44T), and the punchline is that the kicker — not the pair rank — drives the strategy. GTO Wizard ChipEV. Vol.8 of Ajo's MTT Strategy Series.
Written by: Ajo (X: @AjoPoker)
Hi, I'm Ajo.
Vol. 8 is the third postflop installment in the blind heads-up 25bb series — same SB limp → BB 3BB raise → SB call line we covered with A-high (Vol. 6) and K-high (Vol. 7), but now the flop is paired (rainbow only).
The thing you'd guess about paired boards is that the pair rank (A vs K vs 8 vs 4) does the heavy lifting. It doesn't. Across eight boards, the real driver is the kicker — and in particular, the 2.
📌 Setup
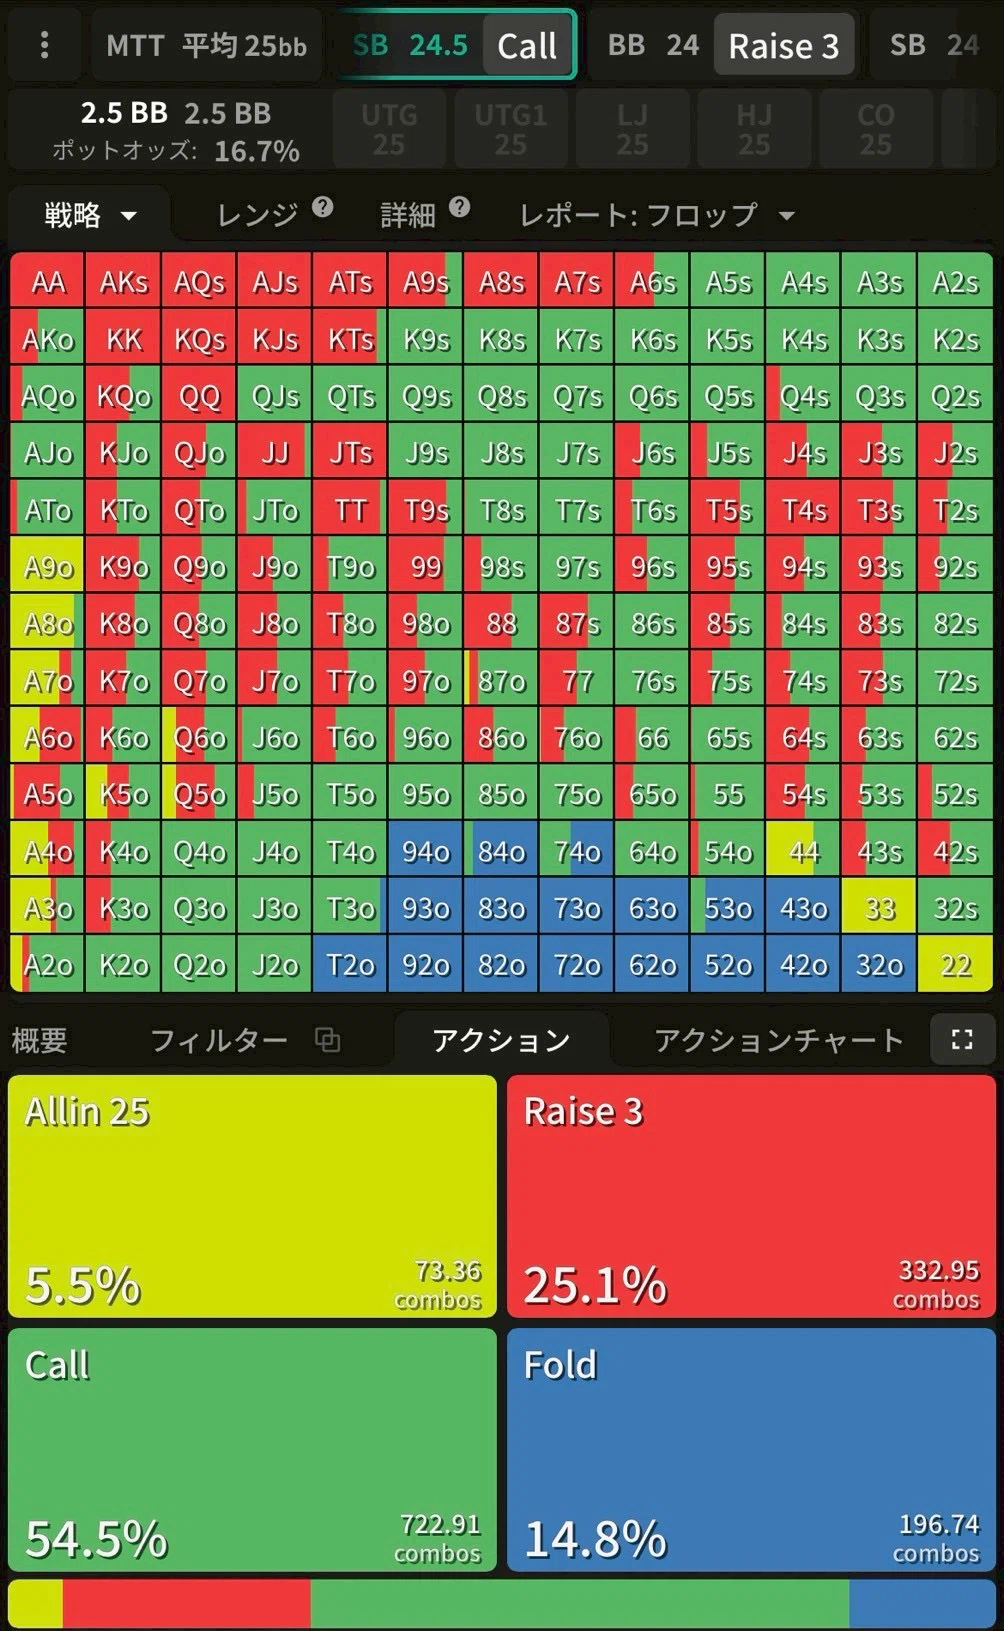
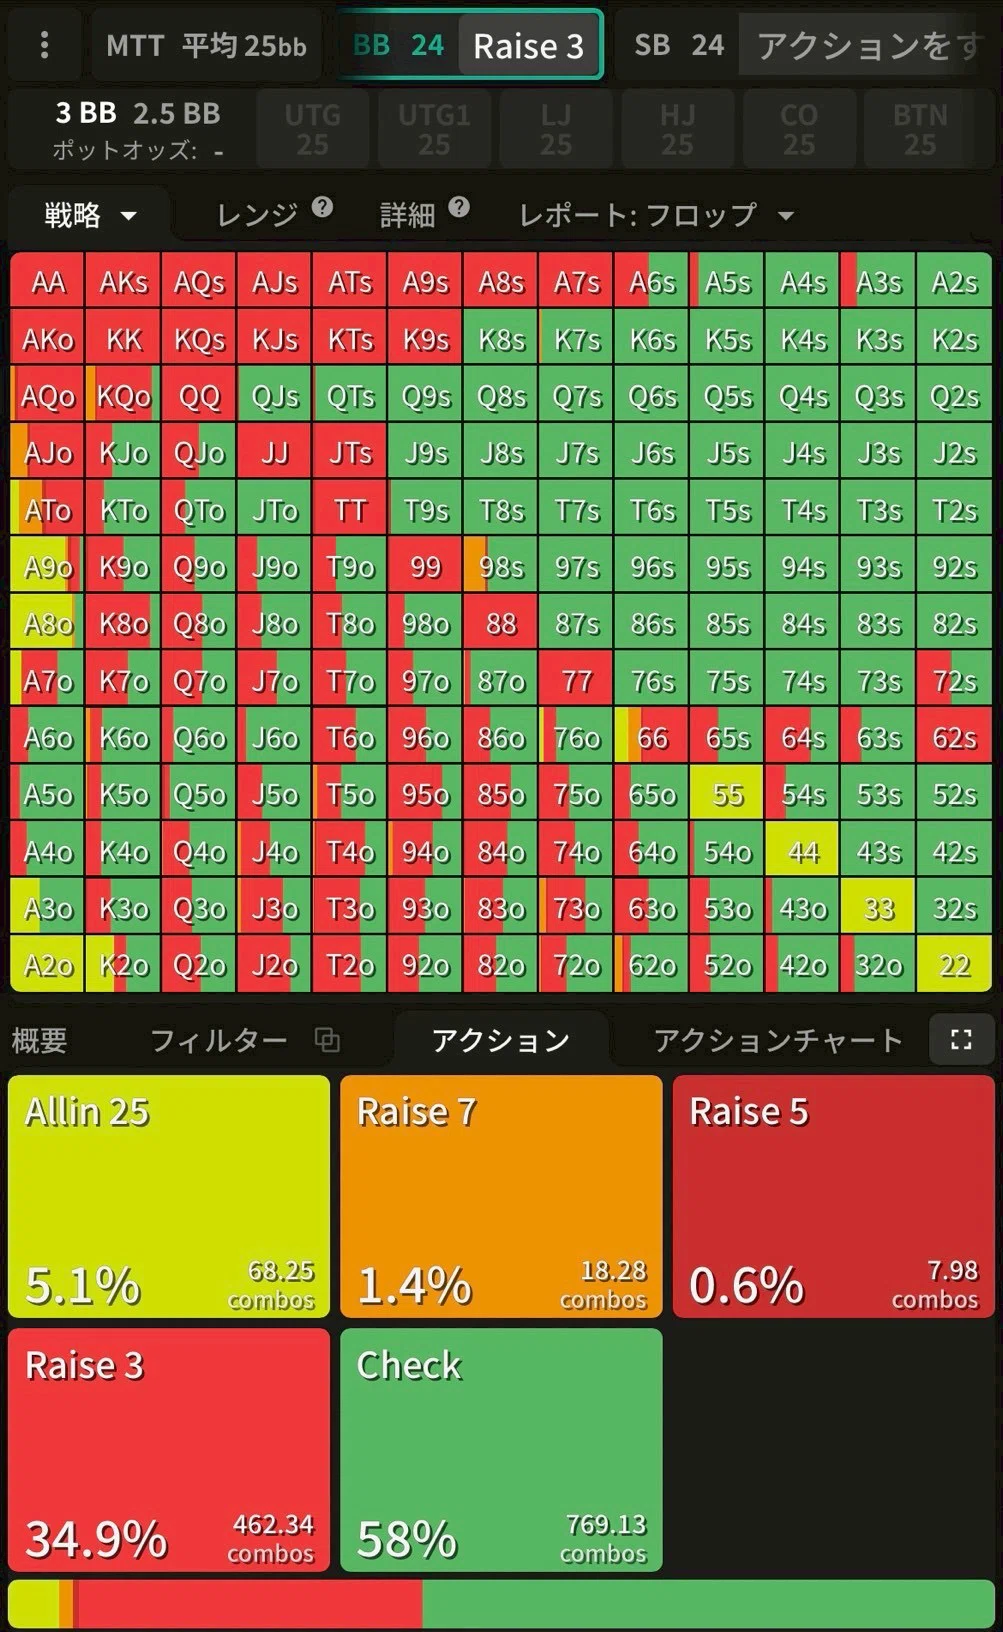
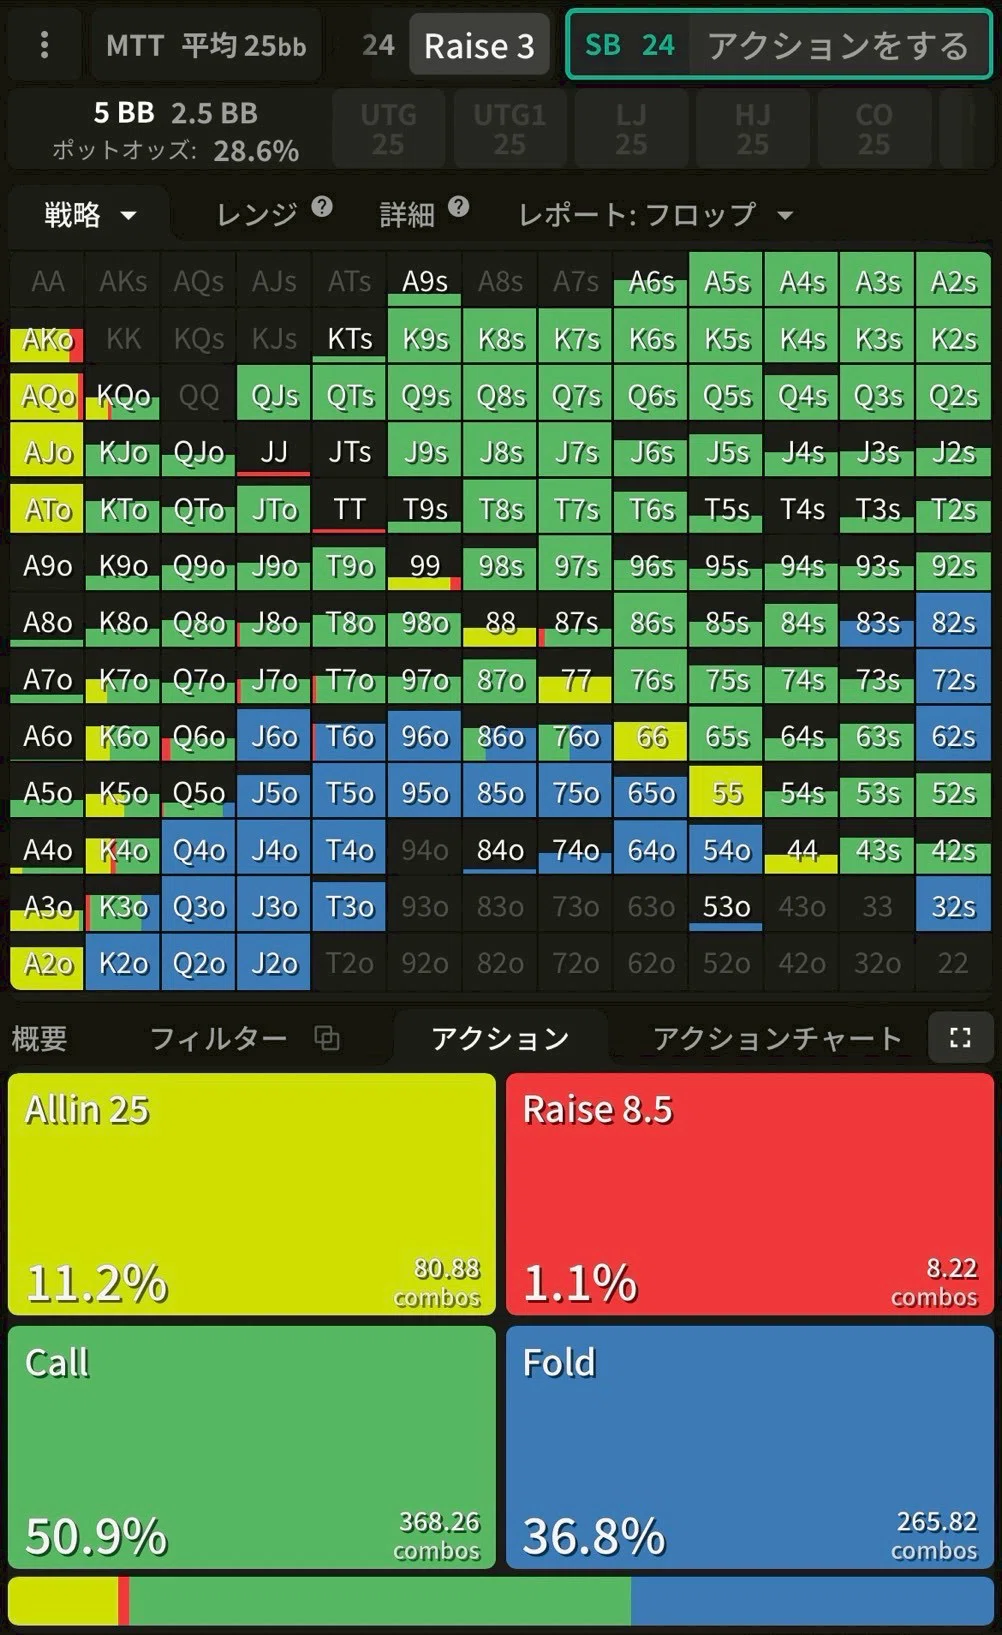
- Spot: blind heads-up at 25bb (same as Vol. 1 / Vol. 6 / Vol. 7)
- Line: SB limps → BB raises to 3BB → SB calls → flop
- Postflop: BB is OOP and the preflop aggressor
- Scope: rainbow paired boards only (monotone / two-tone are out of scope)
- Solution: GTO Wizard ChipEV (no ICM)
💡 Read alongside Vol. 6 / Vol. 7
If you've already absorbed the A-high (Vol. 6) and K-high (Vol. 7) cases, you'll see how this third texture slots into the same framework. The contrasts are where the lesson is.
Preflop Recap (paired-board angle)
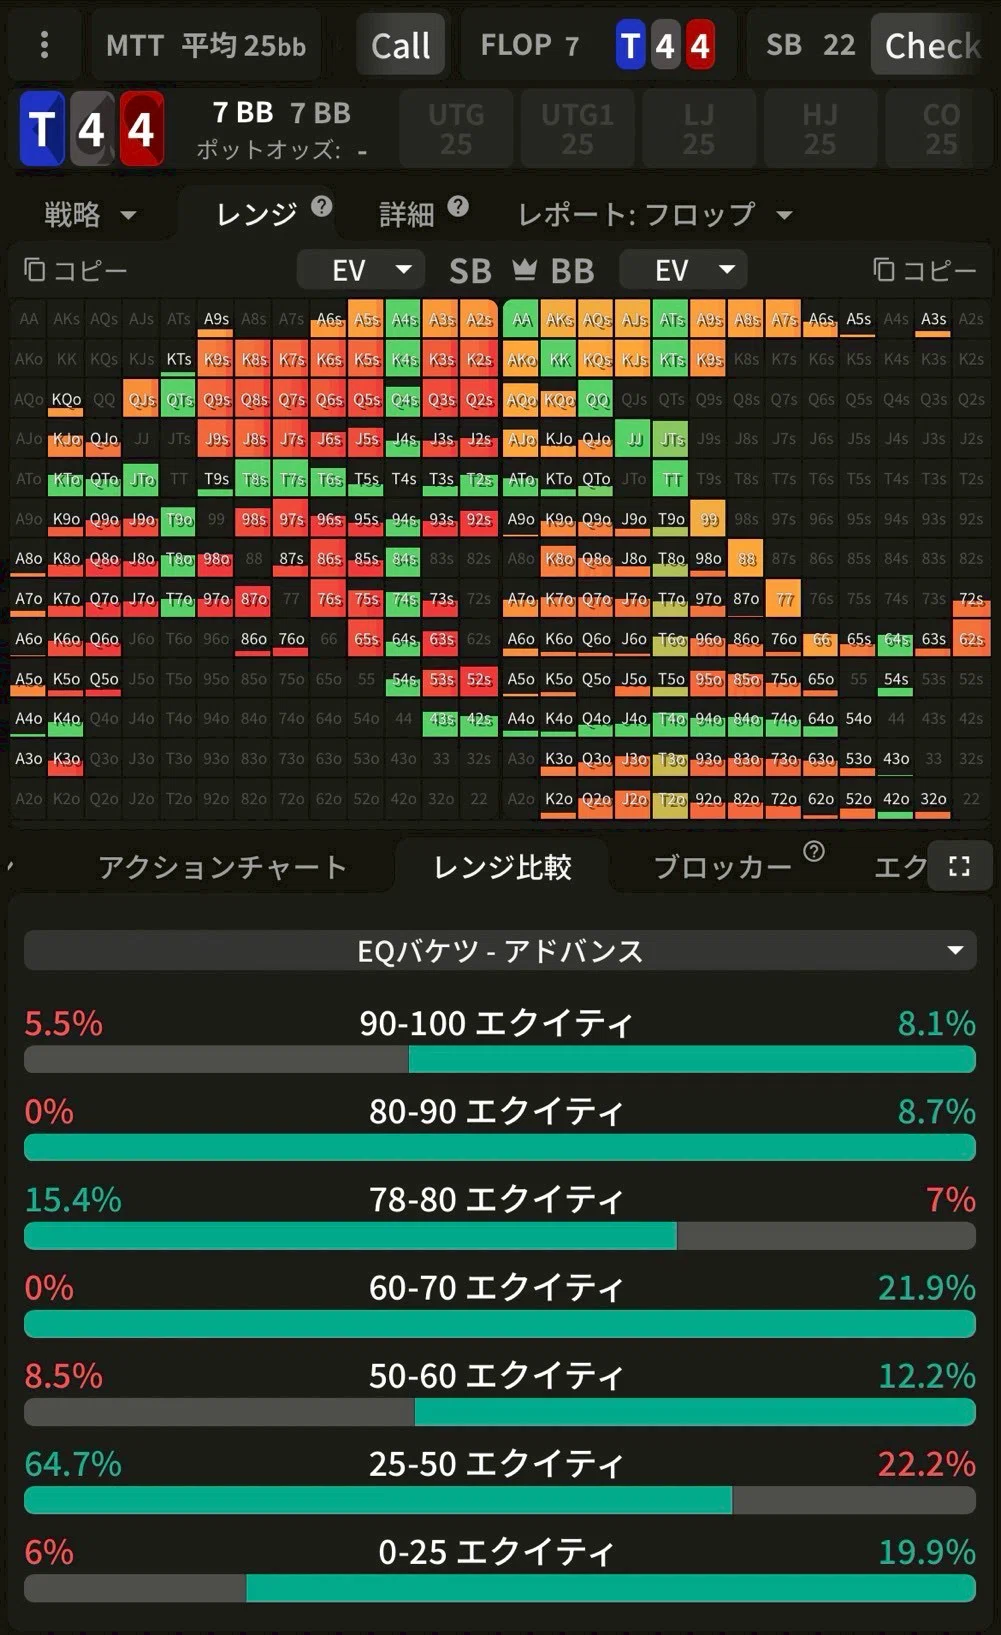
To understand the structural edge on paired boards, the first step is comparing what each side's range actually looks like.
BB (preflop aggressor)
- 66 is indifferent between the 3BB raise and the all-in
- 77+ is a pure 3BB raise
- The range is A-heavy (A7s+, A4o/A5o, etc.)
- And critically, BB raises offsuit trash like 27o and 37o for fold equity → BB has more 2x combos than SB
SB (the caller)
- Suited hands dominate the call range
- But offsuit 2x is basically missing — those hands either folded or got jammed preflop
📍 The core of this article
On boards with a 2 kicker, SB doesn't have the 2x to make two pair. The remaining range is trips (the X-X-2 X-hand) or air — that's it. That simplifies the c-bet enormously.
Group 1: Pair + "2" Kicker
These four boards differ in pair rank (AA / KK / 88 / 44) but share the missing 2x in SB's range, and they all default to a range bet.
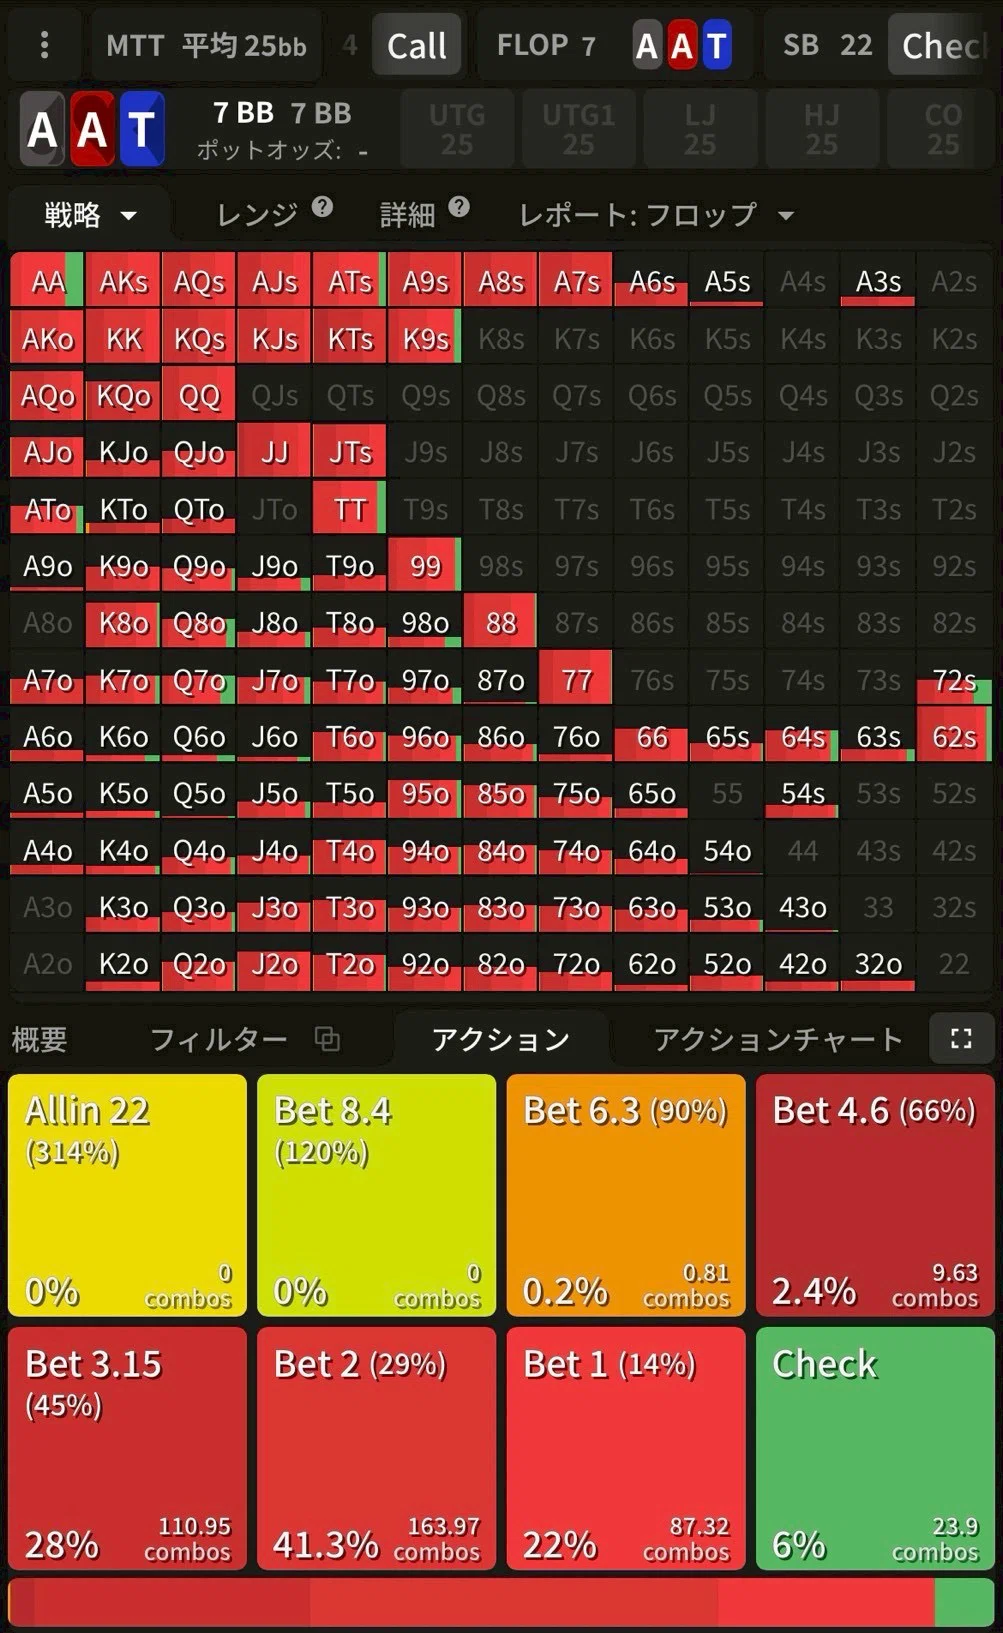
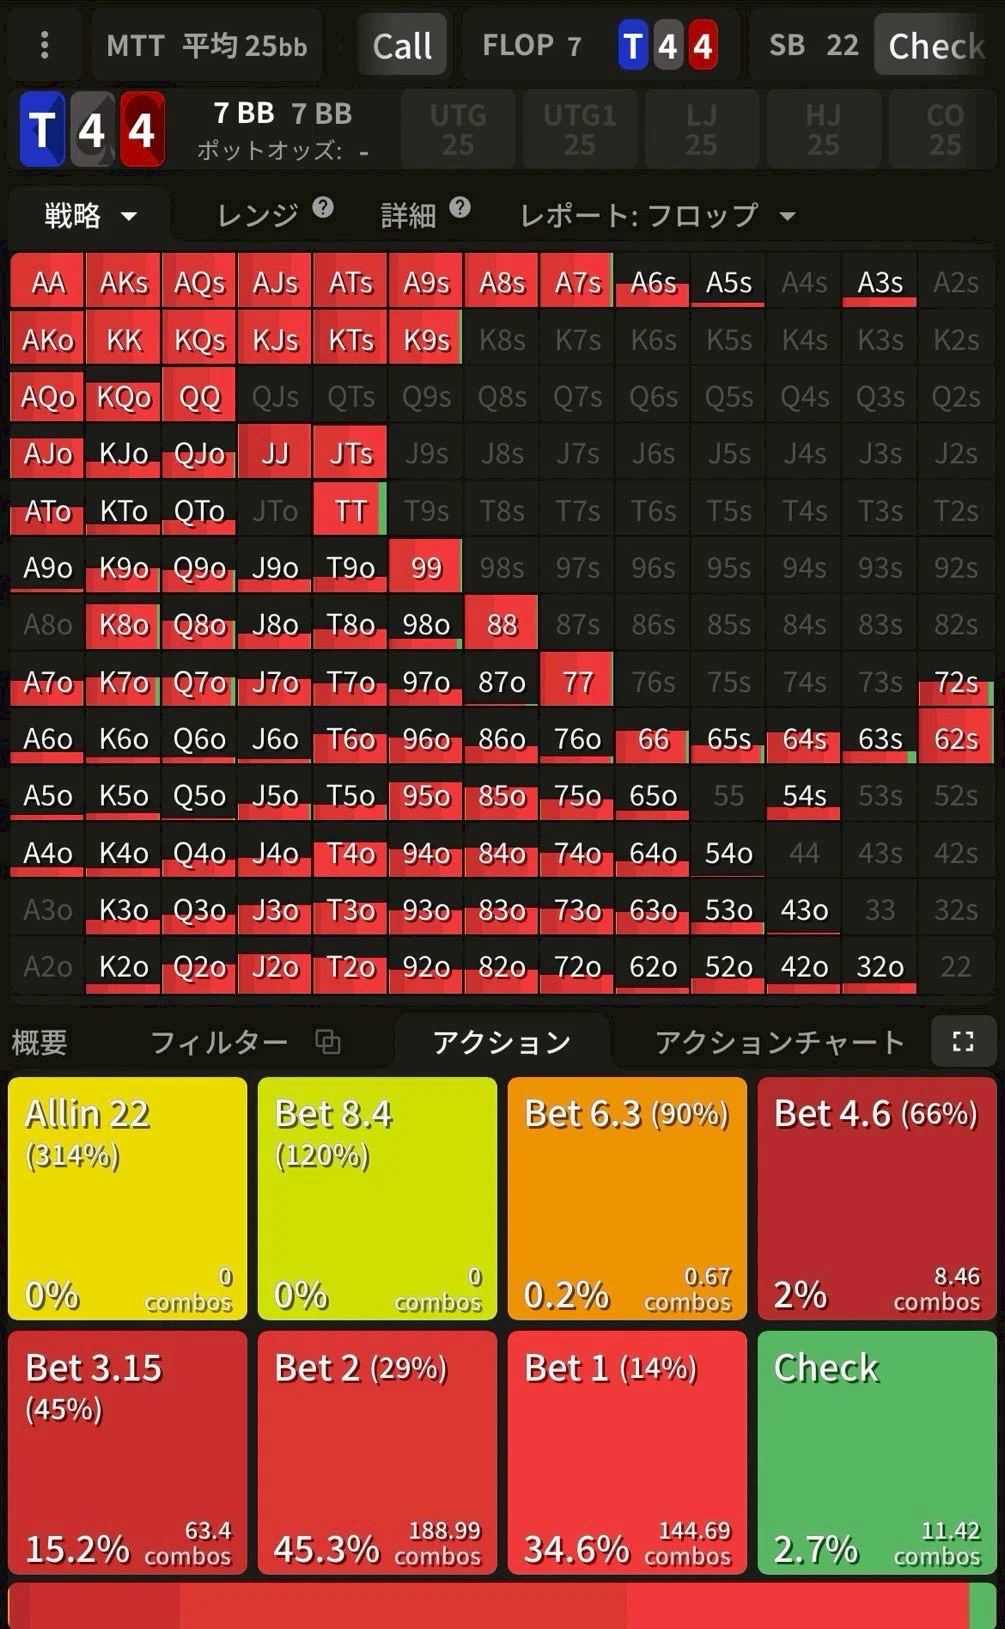
1. AA2 Rainbow
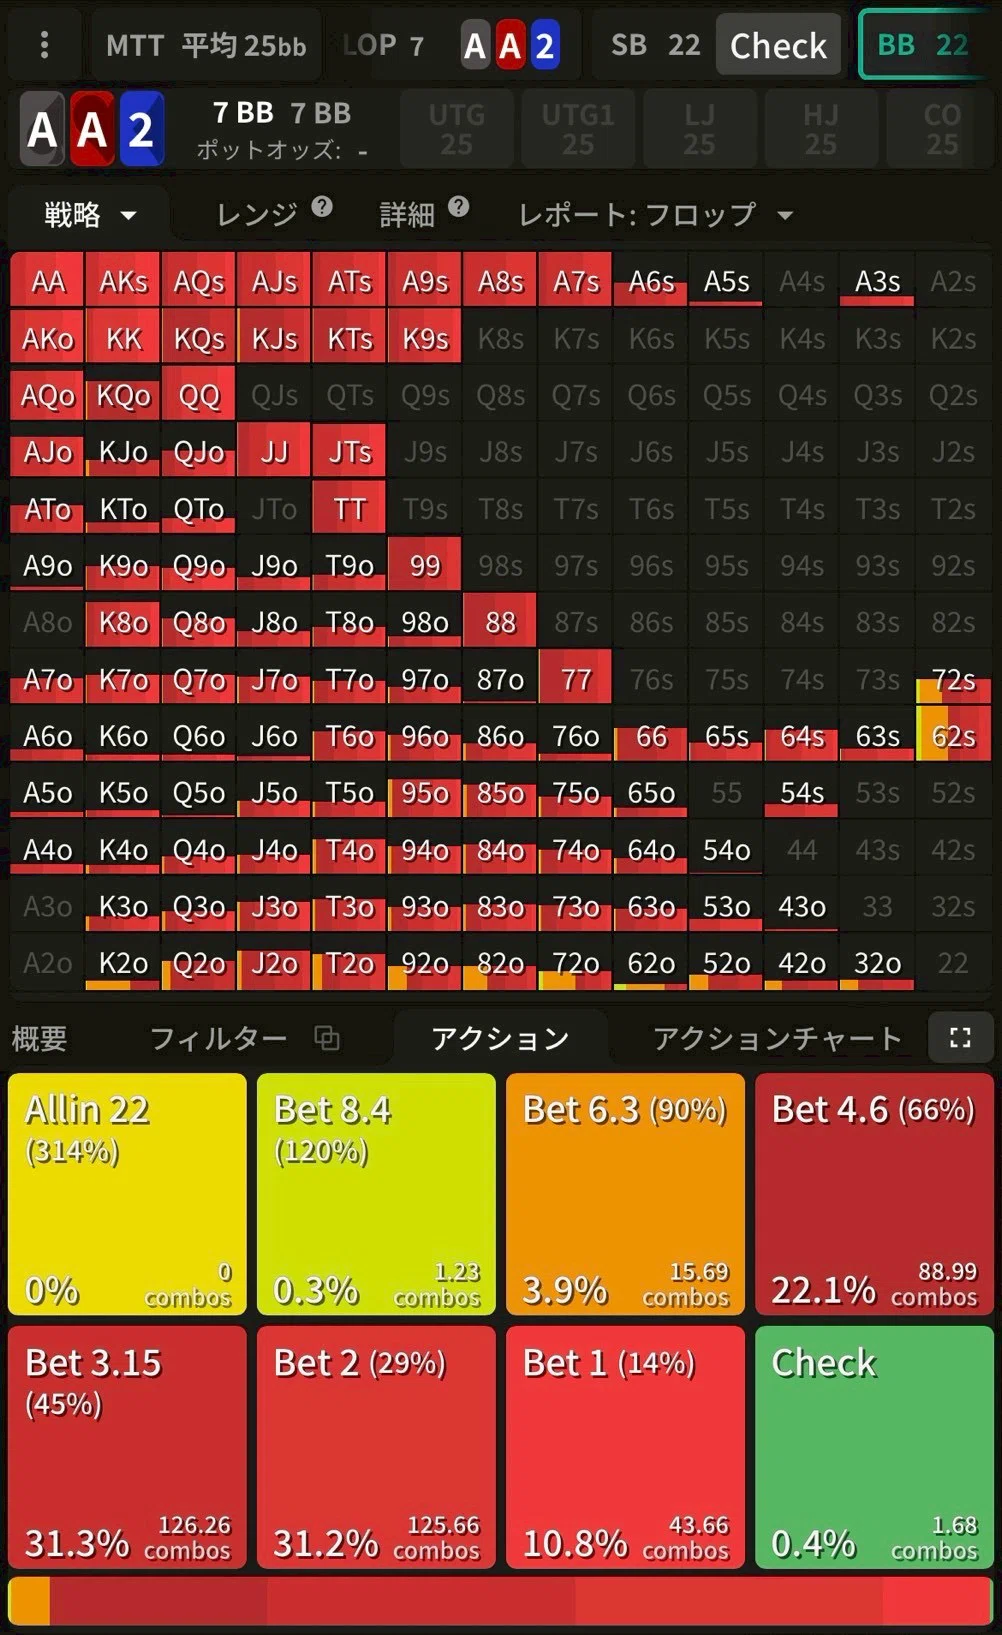
- Range bet
- Sizes used: 14%–66% of pot
The most extreme case. BB has the Ax, SB doesn't have the 2x — so two pair barely exists in SB's range. SB defends with king-high or queen-high or a small pocket pair at best (with two aces already on the board, "ace-high" isn't a thing here). The reason BB can take sizes all the way up to 66% is the absurd fold equity on offer.
2. KK2 Rainbow
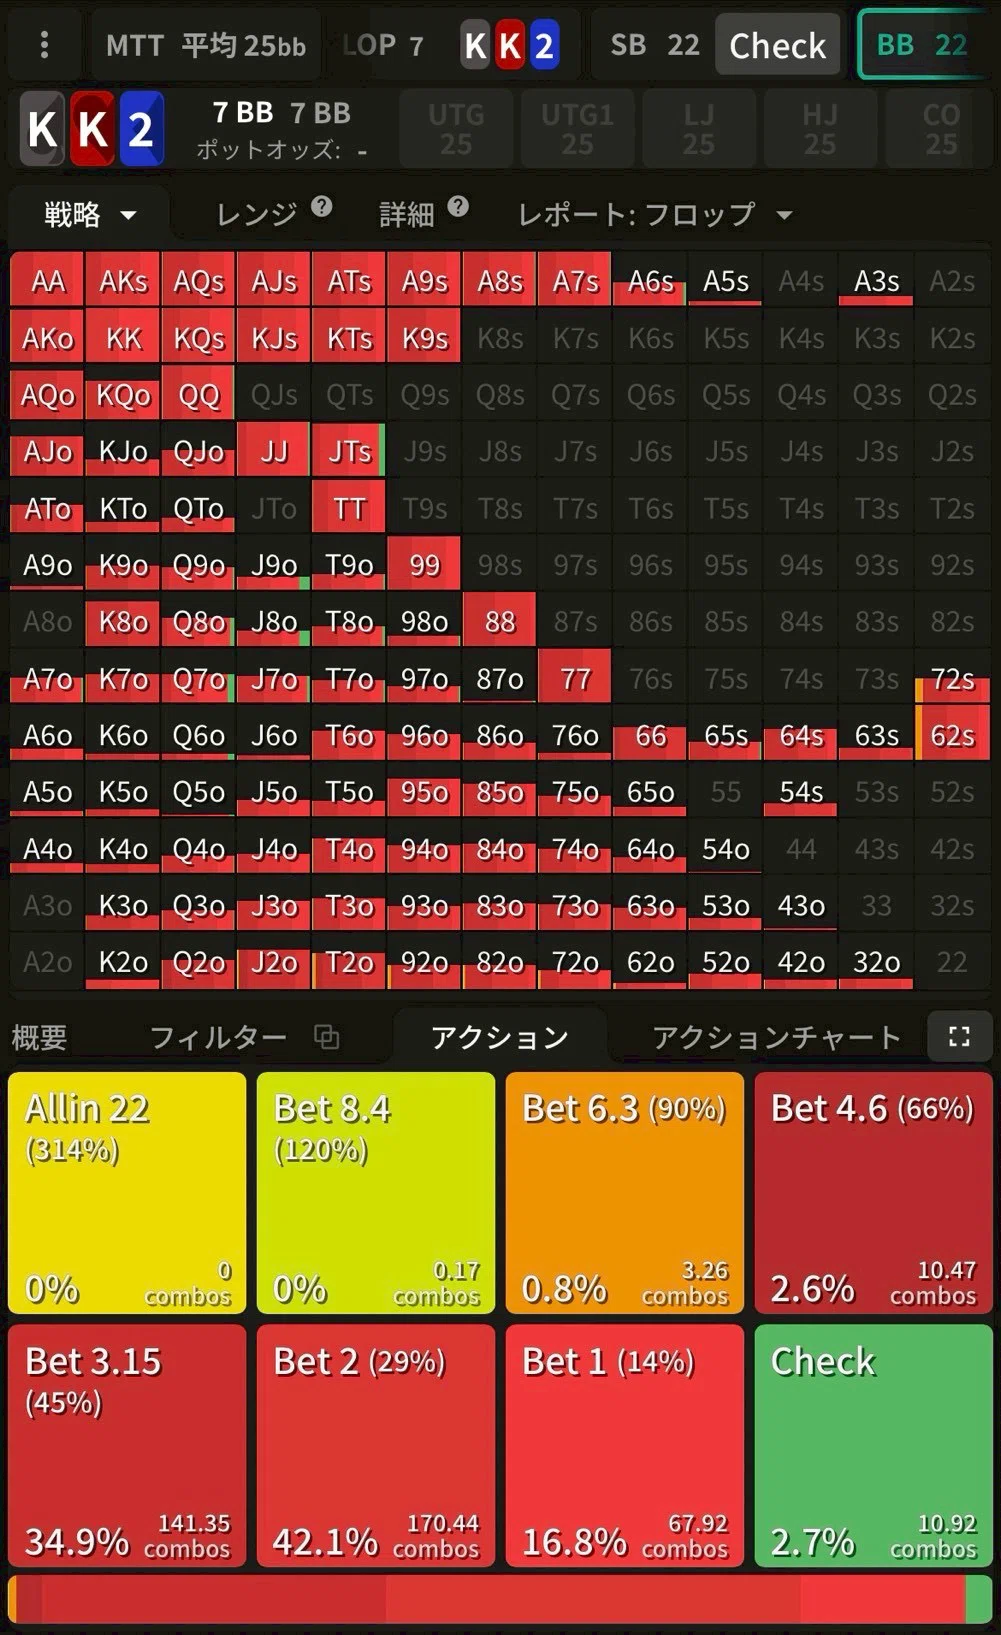
- Range bet
- Sizes used: 14%–45% of pot
K is split more evenly between BB and SB than A is, so the edge is a tick smaller than on AA2. The 45% top size — rather than AA2's 66% — reflects exactly that. The "2x missing from SB" effect is still doing most of the work.
3. 882 Rainbow
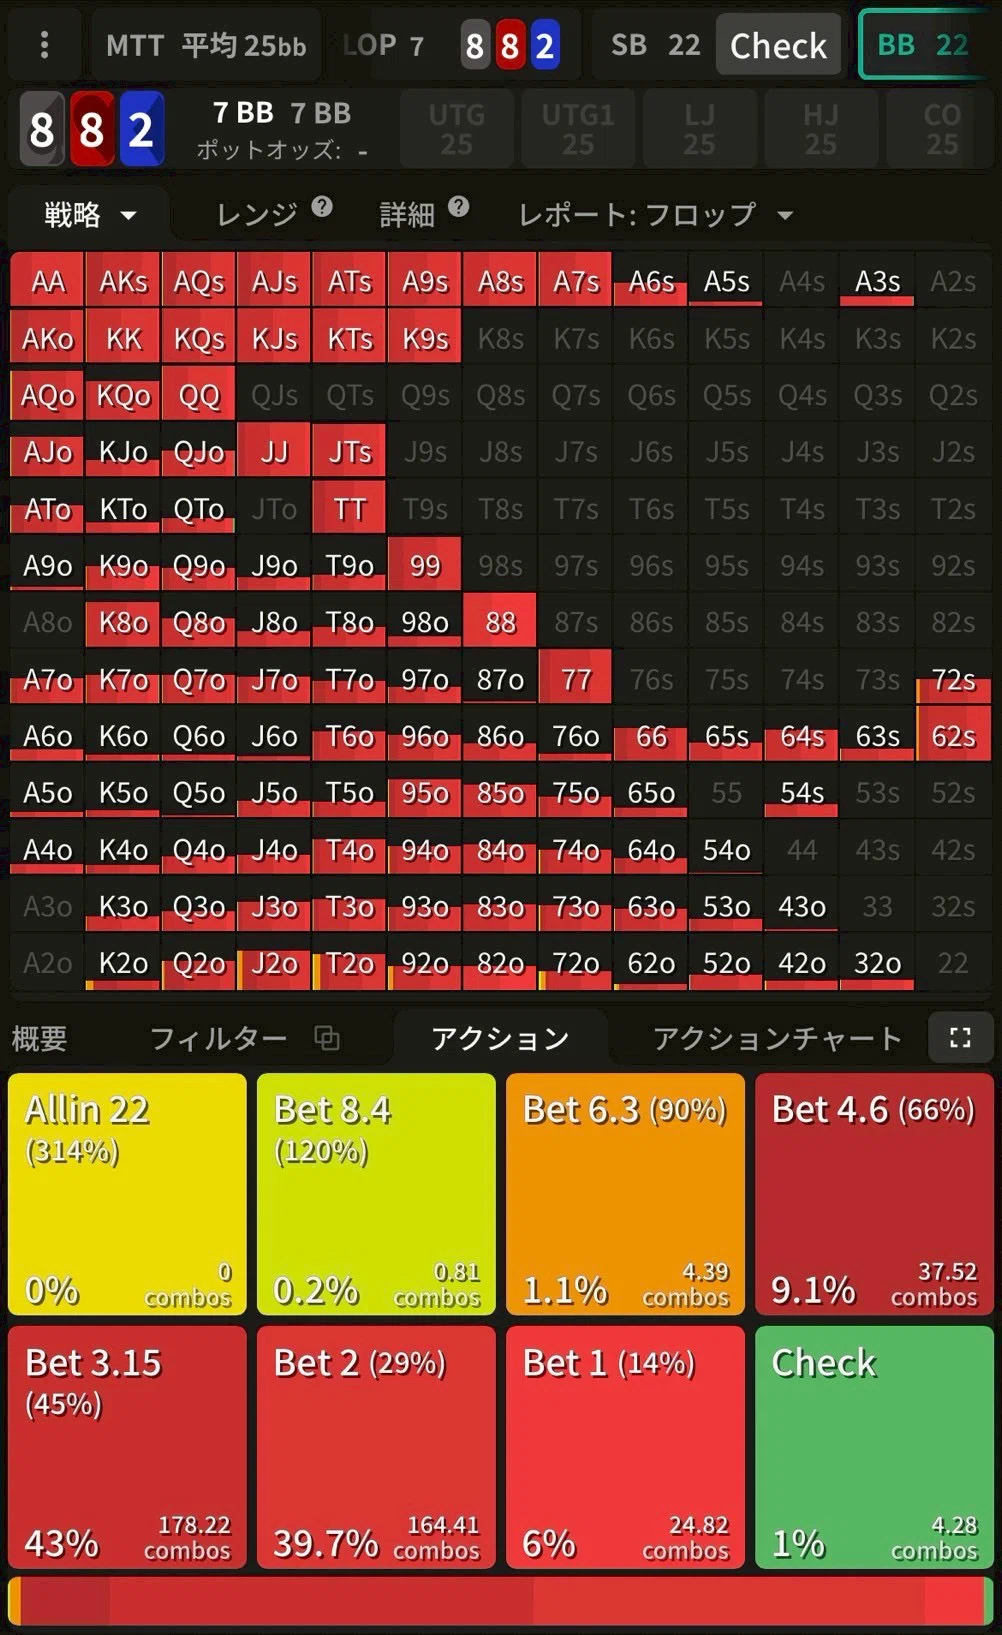
- Range bet
- Sizes used: 29%–45% of pot
The pair drops to 8. Overpairs like 99 step into protection mode and prefer the larger sizes, which is why the floor lifts off of 14% to 29%. There's no "high card that can hang on" in SB's range, so there's no point in a small probe — go straight to the meaningful sizes.
4. 442 Rainbow
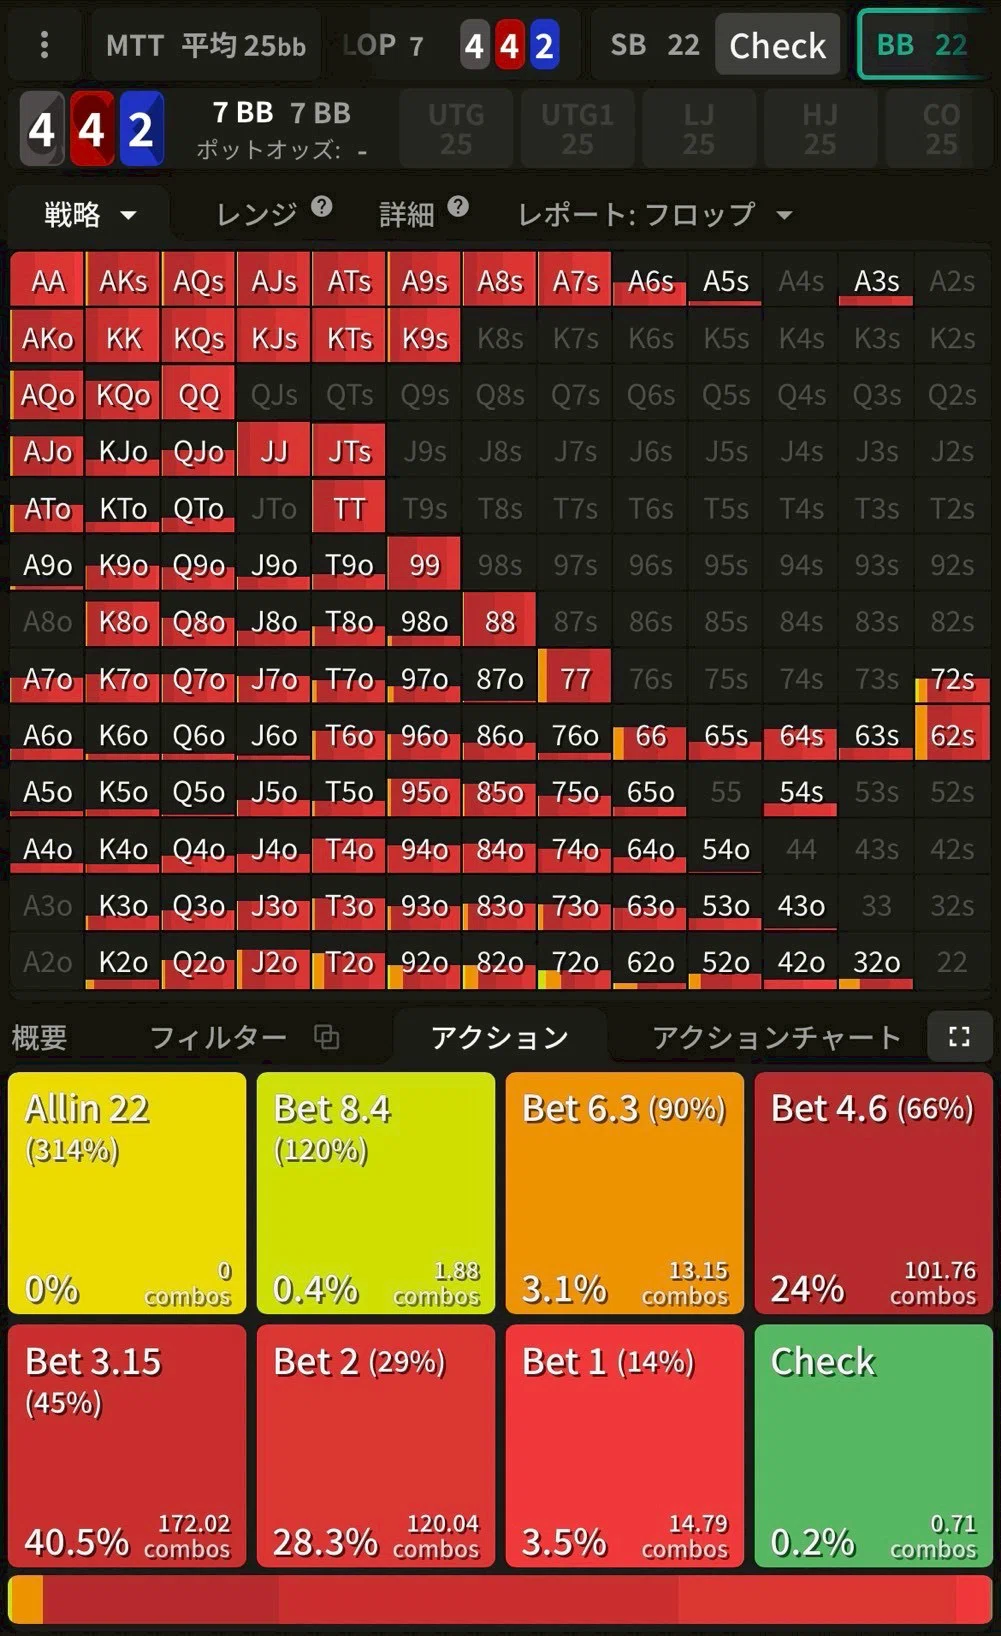
- Range bet
- Sizes used: 29%–45% of pot
Essentially the same picture as 882. Almost every pocket pair becomes an overpair here, so protection-driven larger sizes lead.
Interim Takeaway: the kicker beats the pair rank
The four boards above (AA2 / KK2 / 882 / 442) span every pair strength from AA down to 44, yet all four are range bets where BB has a huge edge.
| What's shared | What it produces |
|---|---|
| "2" is missing from SB's range | SB has no two pair |
| BB widely bluff-raised 2x preflop | Only BB carries any trips combos here |
| SB defends with high card or weak pair only | Fold equity is enormous |
→ The kicker — specifically whether it's a 2 — matters more than the pair rank. That's the headline finding of this article.
📍 Mind the intuition gap
Intuition says "AA2 is a slam dunk, 442 is sketchy." The solver says they're roughly equivalent. On 442, you should be range-betting with the same confidence as AA2.
Group 2: Pair + "T" Kicker
When the kicker shifts from 2 to T, SB does have Tx combos, so the structural edge changes. The four boards drift apart from each other a bit.
5. AAT Rainbow
- Almost a range bet
- Sizes used: 14%–45% of pot
The Ax content edge still tilts the board to BB. The exceptions: AA itself, plus hands with backdoor straight draws (QJ, J9, etc.) lean toward checking to keep the checking range honest.
6. KKT Rainbow
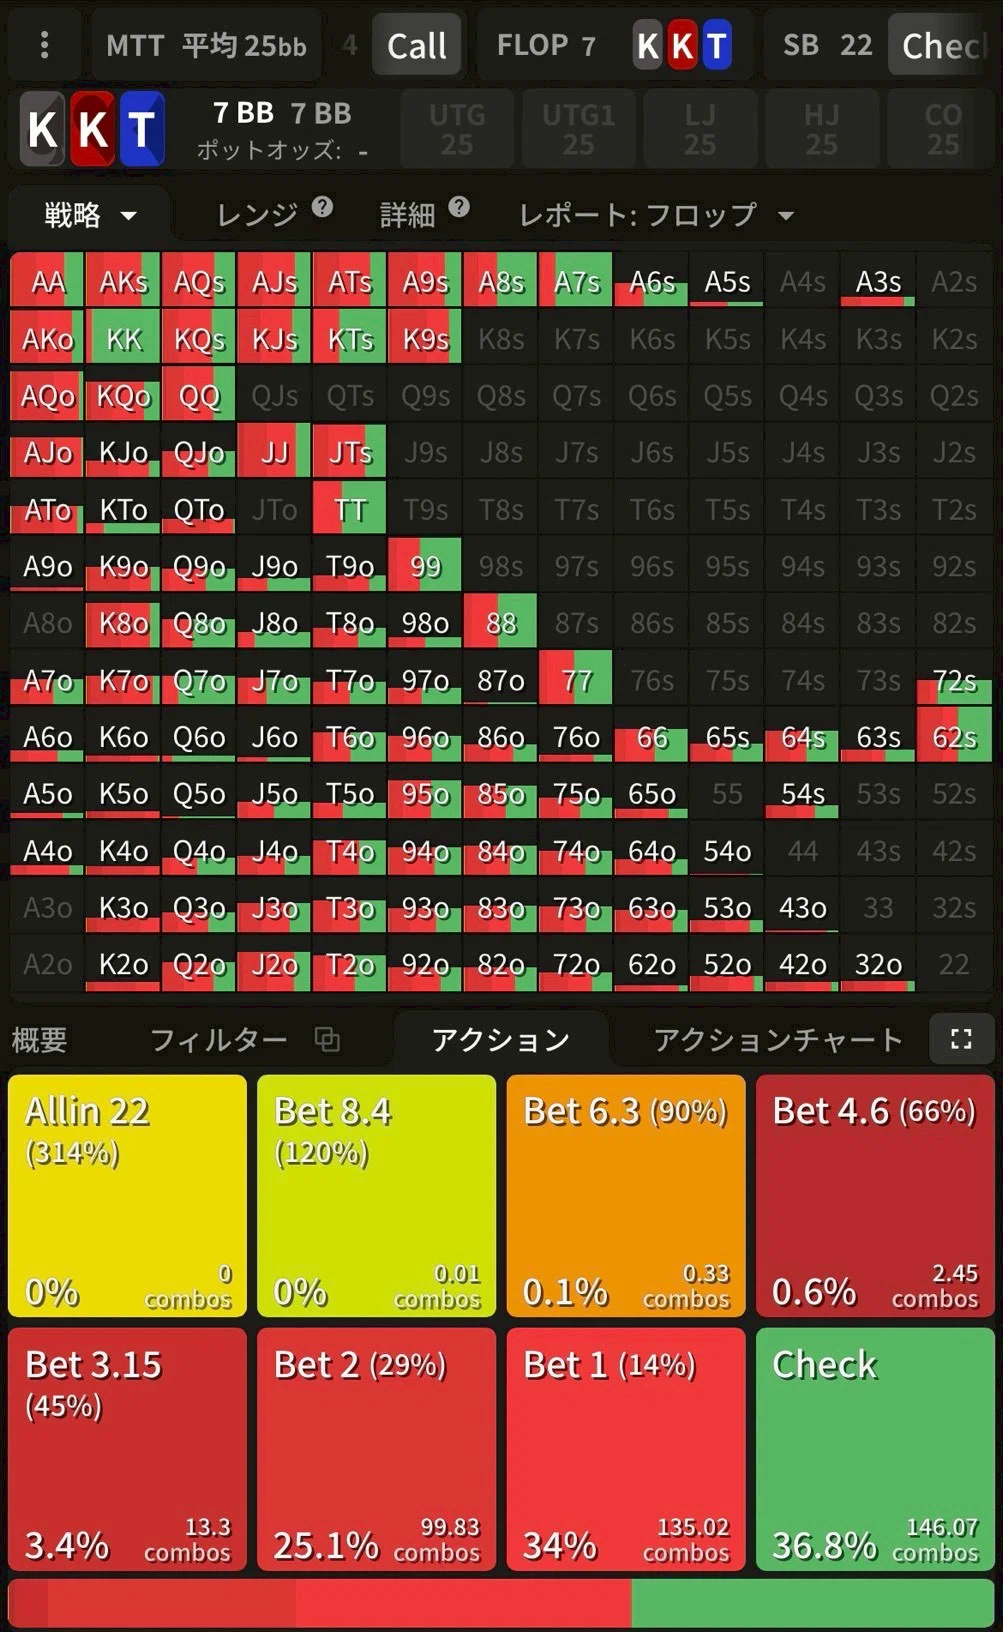
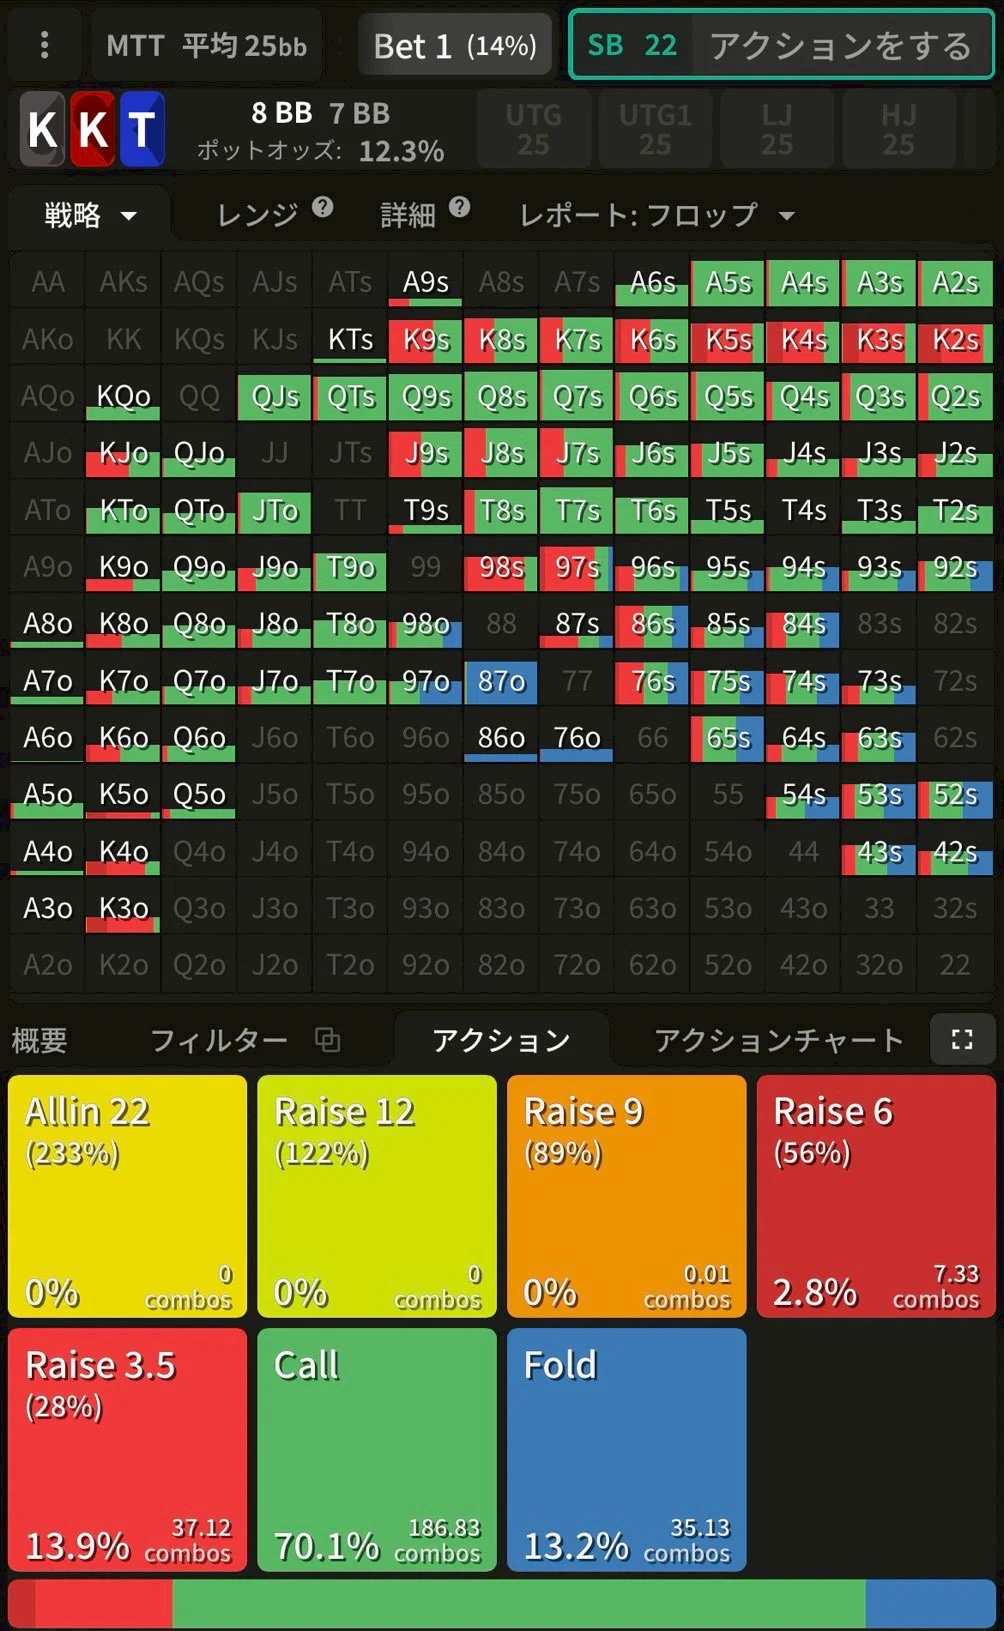
- C-bet frequency: 63%
- Sizes used: 14%–29% of pot
K is shared more evenly between BB and SB, so this isn't the runaway AAT case. Bluffs lean on 23o through 26o (basically zero-equity offsuit garbage from BB's wide preflop bluff layer).
📍 Exploit setup
At equilibrium, SB defends Q-high, J-high, and any backdoor flush draw against the 14% bet. In practice SB over-folds, so the EV of bluffing here runs higher than the solver gives credit for.
7. 88T Rainbow
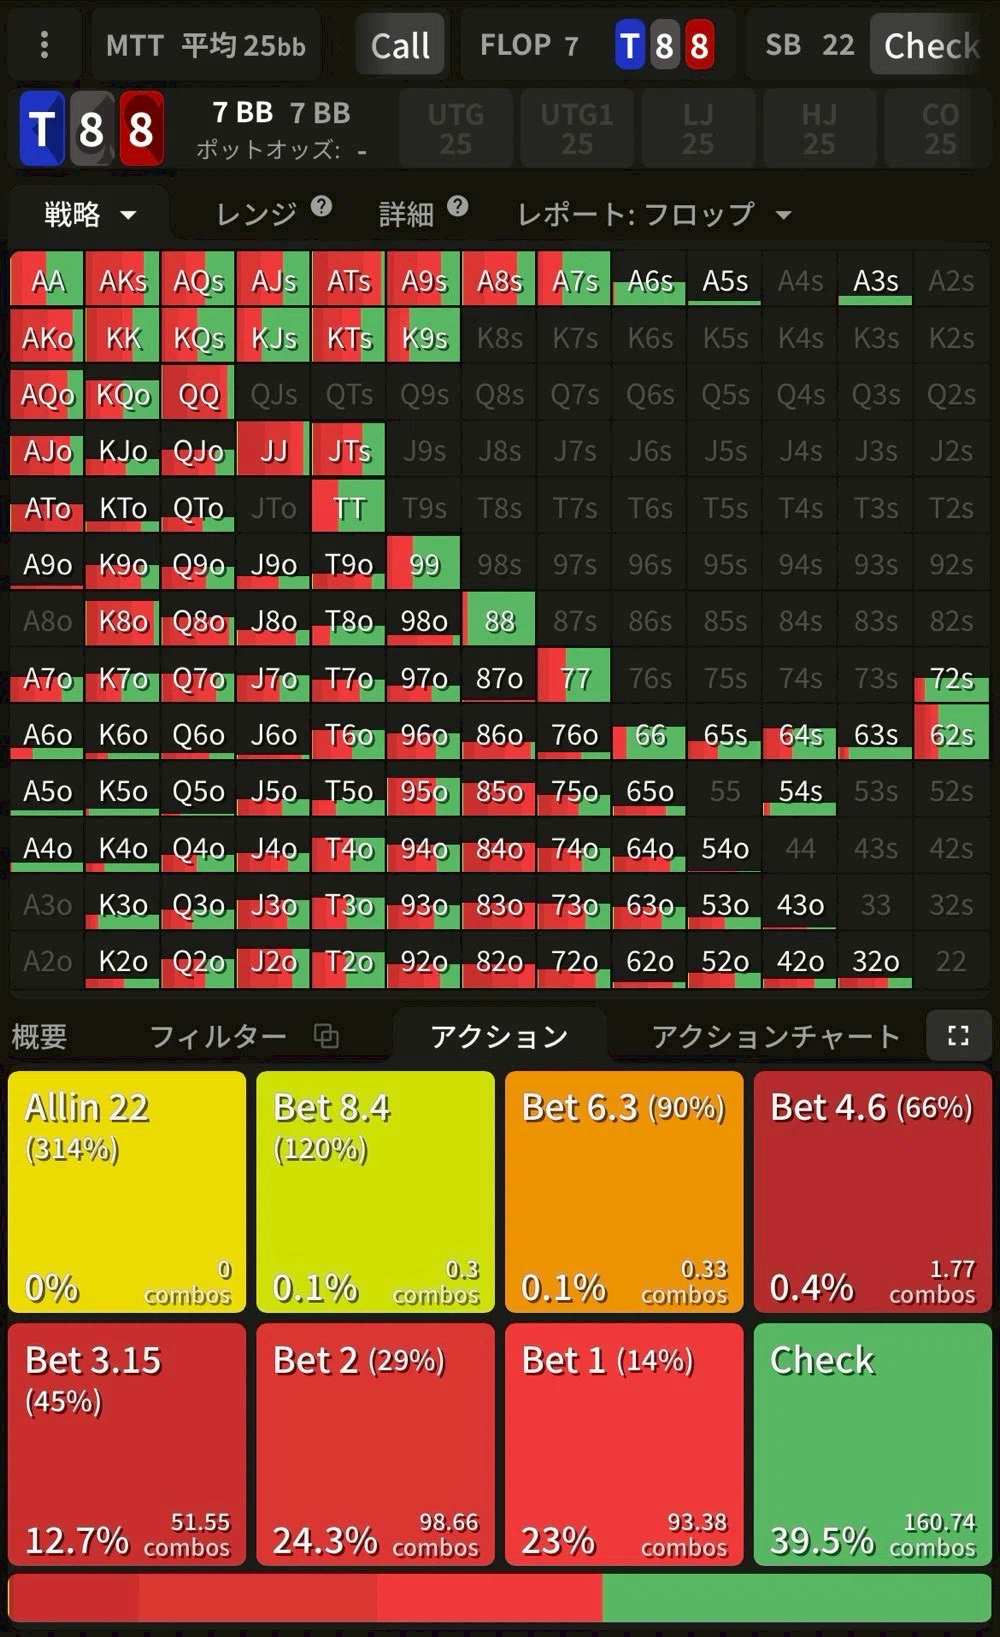
- C-bet frequency: 60%
- Sizes used: 14%–45% of pot
With the pair down at 8, the range bet pulls back to a more selective build.
- 8x (other than 88) almost always bets — trips with a top kicker
- Tx and KK+ check at meaningful frequency to keep the check range honest
Standard GTO move: park medium-strength hands in the check range to keep both branches credible.
8. 44T Rainbow
- Range bet
- Sizes used: 14%–45% of pot
This is the counter-intuitive one. In a more standard CO vs BB SRP, you'd expect "the low kicker (4) sits with the in-position caller, so BB is light on 4x." Here it's the opposite — BB has 4x more often than SB, because BB's polarized preflop raise includes plenty of low offsuit cards.
The reason mirrors Vol. 6 / Vol. 7:
- BB bluff-raised wide with offsuit trash preflop — including offsuit 4x
- SB folded or jammed those preflop, so they're gone from this flop range
Summary
Two big takeaways for the paired-board branch of this line.
Key takeaways
- The kicker — especially the 2 — beats the pair rank. AA2, KK2, 882, 442 all range-bet despite very different pair strengths, because SB has no 2x to make two pair.
- The T kicker breaks symmetry. AAT is still almost a range bet, KKT drops to 63%, 88T to 60%, and 44T snaps back to range bet — a gradient driven by who actually has the Tx and overpairs.
Comparison to Vol. 6 / Vol. 7
| Vol. 6 A-high | Vol. 7 K-high | Vol. 8 Paired | |
|---|---|---|---|
| BB's edge | Overwhelming | Modest | Wildly kicker-dependent |
| Default action | Range bet | ~50% bet | Range bet on pair+2, mixed on pair+T |
| Main size | 29–45% | 14% center | Pair+2: 29–66%, pair+T: 14–45% |
Practical tips
- Drop the "be cautious on paired flops" instinct — on pair+2 boards, just range-bet
- KKT at 63% equilibrium is your over-fold farm — exploit SB's over-folding by bluffing more
- 442 is not a scary spot for BB — your range is genuinely 4x-heavy here
The real value of this spot is seeing where equilibrium diverges from instinct. More installments to come with other lines and textures.
Found this helpful?
Bookmark this page to revisit anytime!
Ctrl+D (Mac: ⌘+D)
Found an error or have a question about this article? Let us know.
✉️ Contact Us
![LJ vs BB SRP C-Bet Strategy | 30bb Board-by-Board Hit Chart [Ajo MTT Vol.3]](/images/thumbnails/article-mtt-cb-lj-vs-bb-srp-30bb-en-sm.webp)
![Blind Heads-Up C-Bet Strategy on A-High Boards (Limp-Raise Line) [Ajo MTT Vol.6]](/images/thumbnails/article-mtt-blind-battle-25bb-a-high-cb-en-sm.webp)
![Blind Heads-Up C-Bet Strategy on K-High Boards (Limp-Raise Line) [Ajo MTT Vol.7]](/images/thumbnails/article-mtt-blind-battle-25bb-k-high-cb-en-sm.webp)